 Application Overview
See the Process page for an overview of the 3D Sprint workflow.
This application is separated into the following module tabs, each module tab contains commands depending on the current printer.As the print is set up and printed these module tabs are used:
|
|
Upon launching the application, you will have access to the Home tab, designed to be your resource hub. |
|
|
Files are prepared for print in Prepare, each part is repaired and edited before setting up the print. |
|
|
The print is set up in Print, parts are imported and support structures and other preparations are made depending on the printer. |
|
|
The print job is sent to the printer and added in Queue. All connected printers can be managed and the print progress viewed here. |
Note: (NextDent 5100 Printer) Click Simple UI ![]() to switch between the simple and the advanced User Interface. In the Simple UI, only the tools for minimum workflow are visible.
to switch between the simple and the advanced User Interface. In the Simple UI, only the tools for minimum workflow are visible.
Note: Click on a module to see more information.
The other main commands are (click on a icon to view topic):
|
|
Set user Preferences. |
|
|
Use Help to open up the help contents. |
|
|
Use Keyboard Shortcuts to view the 3D Sprint keyboard shortcuts. |
Send parts to the Queue for printing or save a print project as a print build file. See Printing Parts in the Print tab for more information.
![]()
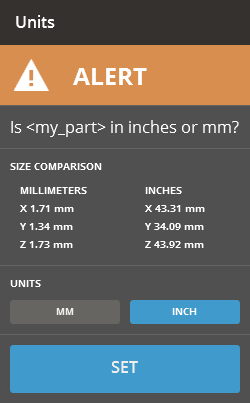
If the application cannot recognize the unit of the part, an alert message will appear. Choose the correct unit and click Set.
Undoing / Redoing
Use undo to undo previous action, use redo to redo an action. Not all actions can be undone. Either use the commands on the command bar or press Ctrl+Z to undo and Ctrl+Y to redo.
![]()
See Also