About - See information about the application in the dialog footer. Refer to the Release Notes to view information on new features and enhancements that were made in the latest version of 3D Sprint.
The Preferences dialog is used to set user defined settings in the application. The preferences are divided into multiple tabs, click on each tab to see the settings. Click Set to apply the new settings.
About - See information about the application in the dialog footer. Refer to the Release Notes to view information on new features and enhancements that were made in the latest version of 3D Sprint.
3D Sprint
General settings for the application.

Check for updates on launch - Automatic checking for new updates. This is recommended to get notified of the latest and safest version of 3D Sprint.
Check For Printer and Material Updates - Automatic checking for new updates of printer database and materials. This is recommended to get notified of the latest printer and material updates.
Localization

Language - Set the language of the application.
Note: You need to restart the application for the changes to apply.
Display Unit - sets the display unit in the application. It also sets the unit used in commands. MM or Inch.
Decimal Places - select the number of decimal places for each measurement type.

Show Figure 4 Tips Prompt on Printer Selection - Shows a prompt that contains a link for Figure 4 printers' instructional videos when selecting the Figure 4 printers.
Reset Dialog Positions - Lick to reset the position of the dialogs.

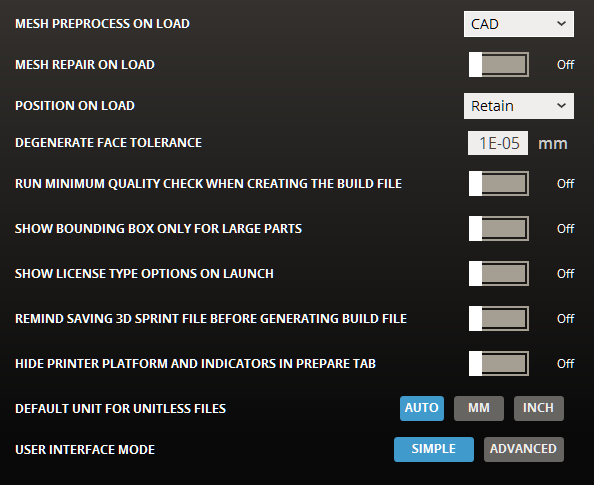

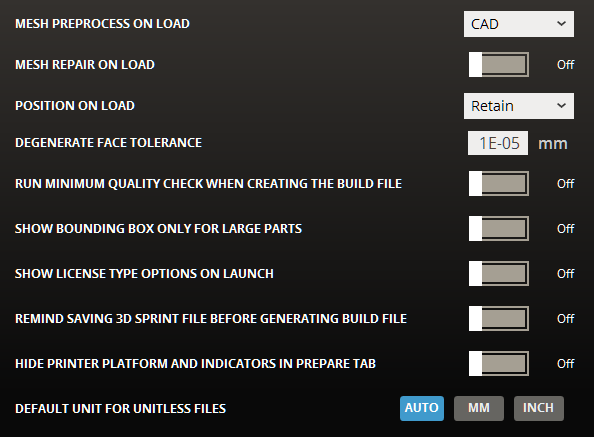
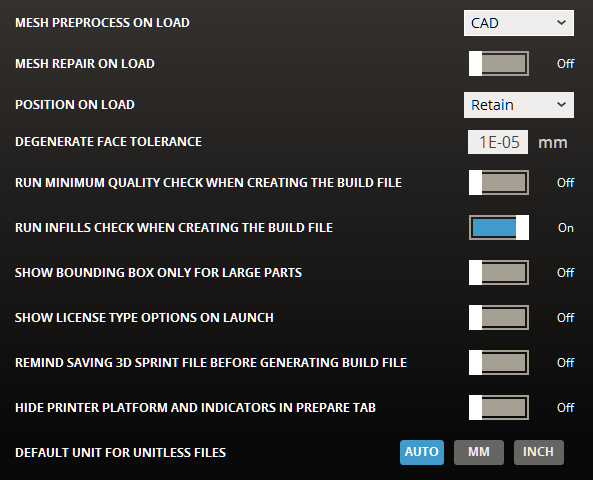
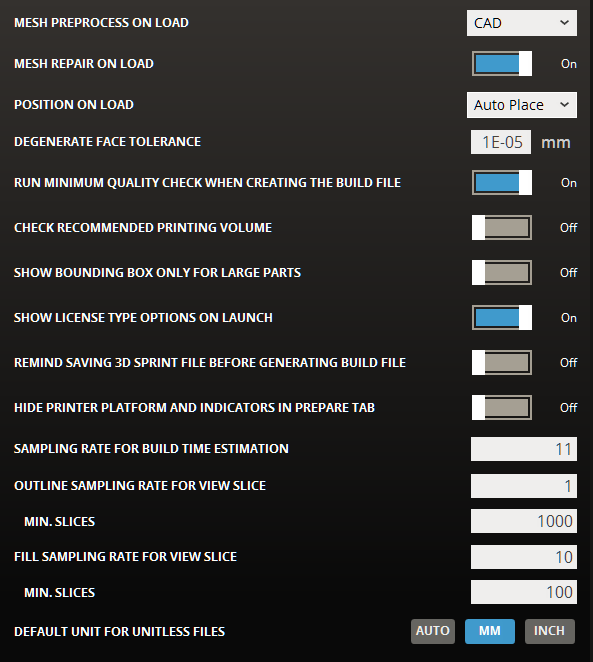
Mesh Preprocess on Import - Specify target entity type for mesh preprocess on import; None, Scan, or CAD.
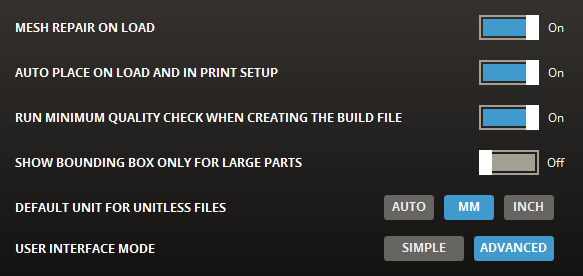
Mesh Repair on Import - Enable or disable mesh healing on import.
Position on Import - Determines how to position parts when importing. Select one of the following:
Retain - Select to keep the original positions of parts.
Auto Place - Select to reposition parts by using the Auto Place command.
Outside - Select to reposition parts outside the Print Platform.
Degenerate Face Tolerance - Enter a tolerance for detecting degenerate faces. The detected degenerate faces can be removed in the Fix command.
Note: Degenerate faces are polygonal faces that are disproportionally long and narrow.
Restore Anchors on Import - Enable or disable restoring anchors on import.
Run Minimum Quality Check When Creating The Build File - Before the creation of a build file, a minimum quality check will be performed.
Check Recommended Printing Volume - When enabled, parts that fall outside the recommended volume are highlighted with a yellow warning on the canvas and the parts list. This prevents a part from being positioned in non-recommended area while using the Transform command.
Note: The Check Recommended Printing Volume option is available only for all SLS printers or ProJet MJP 2500 Plus with VisiJet® M2G-CL material.
Run Infills Check When Creating The Build File - Before the creation of a build file, a check for Infills is performed.
Auto Lane Alternation - Run Auto Lane when importing and using parts for the MJP printers.
Show Bounding Box Only for Large Parts - Changes the display of parts on the platform to only display the bounding box of parts. This help the display performance improve for builds that contain large numbers of parts ( > 500).
Show Bounding Box Only - Off |
Show Bounding Box Only - On |
Show License Type Options on Launch - Shows the license type options on launch and allows to change the license type.
Remind Saving 3D Sprint File before Generating Build File - Shows a reminder to save 3D Sprint file before generating a build file.
Hide Print Platform and Indicators in Prepare Tab - Hides the Print Platform and indicators for selected printer in the Prepare tab.
Sampling Rate For Build Time Estimation (Min. 1 - Max. 32; 1=100%, 10=10% sampling; Default is 11) - Specifies the number of sample layers per build. Increasing sampling rate produces faster results. lowering sampling rate produces more accurate results and requires more time to build. The Sampling Rate is also used to estimate the build time. See Estimate for more information.
Slice Outline Sampling Rate (Min. 1 - Max. 32; 1=100%, 10=10% sampling; Default is 1) - Specifies the number of sample slices for outline of the part. Increasing sampling rate produces faster results. lowering sampling rate produces more accurate results and requires more time to view the slices. The Sampling Rate for outline is used in View Slice. See View Slice for more information.
Slice Fill/Hatch Sampling Rate (Min. 1 - Max. 32; 1=100%, 10=10% sampling; Default is 10) - Specifies the number of sample slices for inside fill or hatch of the part. Increasing sampling rate produces faster results. lowering sampling rate produces more accurate results and requires more time to view the slices. The Sampling Rate for fill / hatch inside of the part is used in View Slice. See View Slice for more information.
Default Unit for Unitless Files - Allows either an Automatic selection based on current distance display units selected, or the selection of MM or INCH for measurements for Unitless Files.
Importing and Exporting Unitless files:
Import/Export unit of unitless data (such as .stl file format) is decided by the 'Default Unit for Unitless Files' option.
Auto (default)
When Default Unit for Unitless Files is set to Auto, the file will be imported using the unit set in Distance Display Unit.
Auto Unit Detection will decide import unit automatically and change inch to mm if imported (in inch) part is bigger than platform.
If part is too large and both units (mm, inch) are not acceptable with current platform, a unit selection dialog will be shown to choose manually.
MM or INCH
When Default Unit for Unitless Files is set to mm or inch, the file will be imported using this unit, but displayed in the units set in Distance Display Unit.
However if imported part is larger than current platform, a manual unit selection dialog will be shown to change the import unit used manually.
User Interface Mode (NextDent 5100 Printer) - Expands user interface functions for the advanced user.
Directory
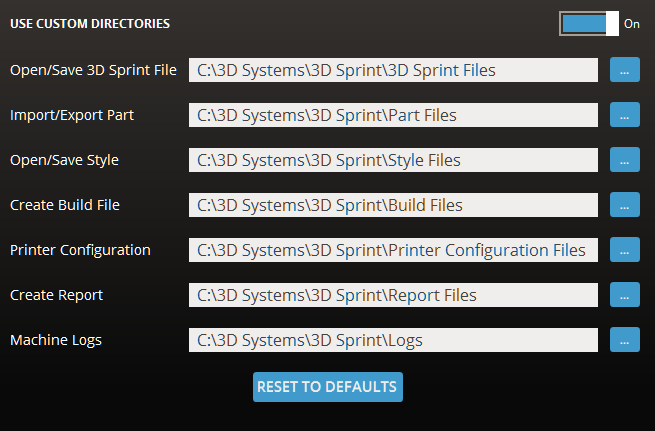
Use Most Recent - Enable or disable using most recently used directories. To reset the custom directories to defaults, click Reset to Defaults.
Note: If a specified path is invalid, the Directory input box is marked in red. Redefine the directory.

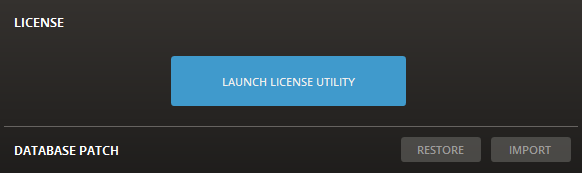
License:
Launch License Utility - This button will launch the 3D Systems License Utility. More information about the License Utility can be found here.
Database Patch:
This feature allows for the import of a database patch to update the local 3D Sprint client database for users with a specific need outside of the normal client Auto-Update.
Restore - The restore command restores the local database back to the version default.
Import - The import button allows the selection of an Material Patch File (.mtlddd) to update the local application database.
To patch or restore the database:
Launch the 3D Sprint application as ‘Administrator’ on the local computer (Right click on the program icon in Windows and select 'Run as administrator')
Open the Preferences interface.
Go to the About tab
Under Database Patch click Import
This allows the selection of an Material Patch File (.mtlddd) to update the local application database.
or
Click Restore to set the application back to the version default.
Click Set to apply the material patch.
Note: When clicking Set, the progress of applying is shown and then a warning message will appear, that says that you need to restart 3D Sprint to take the effect of the patch.
Close and restart the application.